

Getting started: a seller's first steps
What to do, in which order, after you open your account — and where everything is in the Seller Center menu.
Last checked: 1 October 2026
এই গাইডটি বাংলায় পড়ুনContents
The order of things
- Open an account — Account, sign-in and password.
- Add your company details and logo — Company page and profile.
- Start verification (identity, phone and email, trade licence, ERC, factory photos) — Verification and trust badges.
- Submit the bank account you want to be paid into — Certificates and payout bank account.
- Add and publish products — Add and publish a product.
- Answer buyers' requests and RFQs — Order requests, RFQs and quotations.
- When a buyer accepts a quotation an order is created — Orders and shipments, Funds holds and payouts.
Opening an account in the Seller Center
You register at seller.exportain.com/register in two steps: first you choose how you sell, then you give your own and your company's details. Code expiry and the other rules are in Account, sign-in and password.
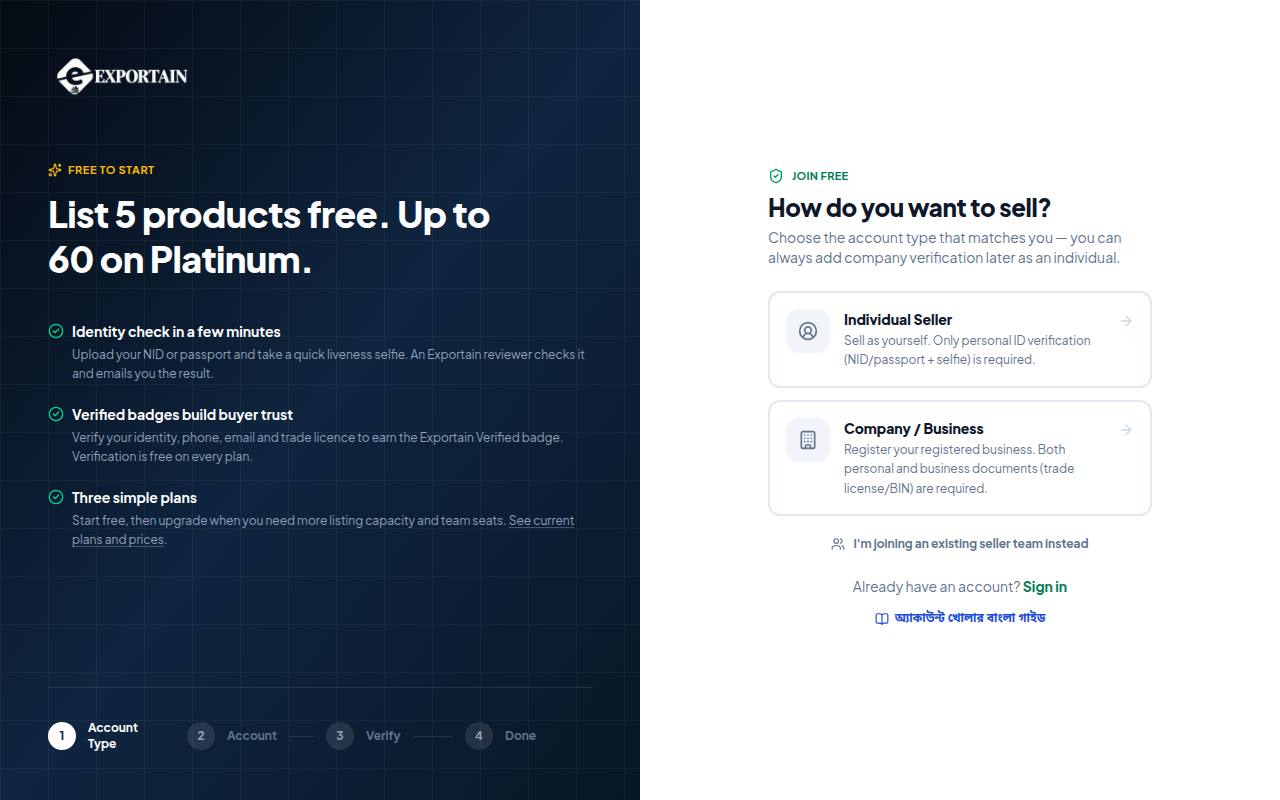
- 1. Individual Seller — selling in your own name. Verification later needs only an NID or passport and a live selfie.
- 2. Company / Business — a registered business with a trade licence. It needs both personal and business documents, and it is the route to the Exportain Verified badge.
- 3. I'm joining an existing seller team instead — if your company already has an account, don't open a second company. Choose this and the owner adds you to the team.
- 4. The step tracker shows where you are: Account Type → Account → Verify → Done.
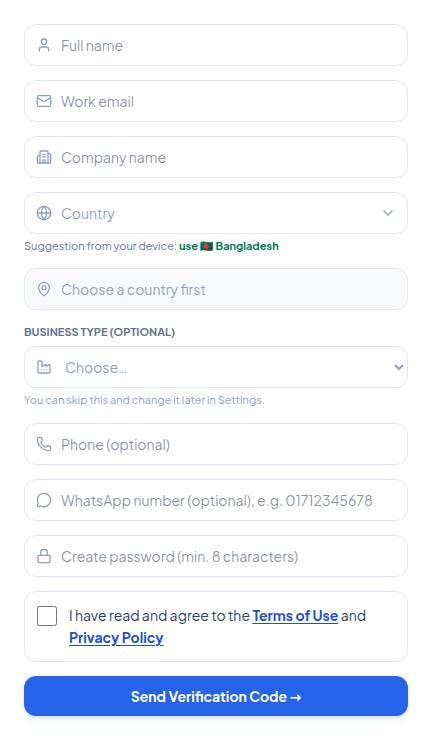
- 1. Full name — your real name, as on your NID or passport. Identity verification later checks against it.
- 2. Work email — an address you read every day. The 6-digit code arrives here.
- 3. Company name — exactly as written on your trade licence. This is the name buyers see.
- 4. Choose your Country, then the city (optional). Business type can wait — you can set it later in Settings.
- 5. Phone and WhatsApp numbers are optional. If you give a WhatsApp number, tick the consent box under it.
- 6. A password of at least 8 characters, then tick the box for the Terms of Use and Privacy Policy.
- 7. Press Send Verification Code →. Enter the code from your email and press Verify & Create Account — your account is ready.
Frequently asked questions (FAQ)
Can I sell without verification?
Yes. Verification is not required, but without badges buyers may trust you less. And to receive funds-hold money you must have an approved bank account.